To remove scratches from wood, start by identifying the scratch depth. For light surface marks in the finish, apply Howard Restor-A-Finish or a quality paste furniture wax. For medium scratches that cut through the finish into the wood, use a matching wood stain marker followed by a clear topcoat. For deep gouges, fill with a burn-in stick or wood filler, sand flush, restain, and reseal. Full step-by-step instructions for each method are below.
1. Identify Your Finish Before You Start (Identify Your Finish)
This is the step most repair guides skip — and it's the reason many attempts go wrong. Different wood finishes respond differently to the same products. Using the wrong approach on the wrong finish can make a scratch more visible, not less.
Here's how to identify what you're working with before touching anything:
- Polyurethane or lacquer (most common on modern furniture): The finish sits on top of the wood like a protective shell. It has a noticeable sheen, and water beads on the surface rather than absorbing. Scratches in this finish often appear milky or white because light scatters inside the damaged clear coat layer.
- Oil finish: The wood has a matte or satin appearance and feels closer to raw. Water absorbs slowly rather than beading. This finish penetrates the wood fibers rather than sitting on top. Common on Scandinavian and craftsman-style furniture.
- Wax finish: Similar in appearance to an oil finish but even more matte. If you run a fingernail lightly across the surface and it leaves a faint mark in the finish itself — not the wood — it is likely wax. Common on antiques and traditionally hand-finished pieces.
- Shellac or varnish: Typically found on older or antique furniture. Shellac dissolves with alcohol — place a small drop of rubbing alcohol on an inconspicuous spot. If the finish becomes tacky or softens, it is shellac.
- Why this matters: Products formulated for polyurethane finishes need to bond with the existing clear coat — such as Restor-A-Finish or a compatible polyurethane touch-up product. Repair products designed for oil or wax finishes work by penetrating and conditioning the wood surface. Using the wrong product for the wrong finish wastes time at best and damages the surface at worst.
2. Assess the Scratch Depth (Assess the Damage)
Once you have identified your finish type, examine the scratch carefully. Run your fingernail across it perpendicular to the groove.
- Doesn't catch → Surface-level scratch in the finish only. The wood fiber beneath is untouched.
- Catches slightly → Medium scratch. The finish is broken and the wood is lightly scored.
- Catches significantly or feels like a clear groove → Deep scratch or gouge. Wood material has been removed.
This single test determines your entire repair approach. Starting with the wrong method wastes time and risks making the damage harder to correct.
3. Quick Comparison: Scratch Type vs. Best Method (Comparison Table)
| Scratch Type | What It Looks Like | Most Reliable Method | Best Product | Time Needed |
|---|---|---|---|---|
| Light / surface | Faint line, no groove | Furniture wax or Restor-A-Finish | Howard Restor-A-Finish | 5–15 min |
| Medium | Visible line, finish broken | Stain marker + clear topcoat | Minwax Stain Marker | 30–60 min |
| Deep / gouge | Groove you can feel | Wood filler or burn-in stick | Mohawk Burn-In Sticks | 1–3 hours |
| White / cloudy mark | Milky finish cloudiness | #0000 steel wool + clear wax | Howard Restor-A-Finish | 10–20 min |
4. How to Fix Light Scratches on Wood (Light Scratches)
Light scratches exist only in the finish layer. The wood fiber beneath is completely intact. The goal here is to restore the clarity and sheen of the topcoat without disturbing the surrounding surface.
Option A: Howard Restor-A-Finish
This is one of the most effective products available for light scratch repair. Rather than filling the scratch with a separate material, it chemically merges with the existing finish to restore its original appearance. It works particularly well on polyurethane, lacquer, and varnish finishes.
- Clean the surface with a dry cloth to remove dust and debris.
- Select the Restor-A-Finish shade that most closely matches your wood tone.
- Apply a small amount to a soft cloth and rub along the scratch, following the wood grain.
- Wipe away any excess immediately.
- Buff lightly once dry.
Test on an inconspicuous area first to confirm the color match before treating the visible surface.
Option B: Quality Paste Furniture Wax
A quality paste wax — such as Briwax, Howard Feed-N-Wax, or Minwax Paste Finishing Wax — fills micro-scratches and restores sheen in a single application. This is the safest and most accessible option for finish-only scratches on any furniture type.
- Clean the surface with a dry cloth and ensure it is completely dry.
- Apply a small amount of wax with a soft cloth using circular motions over the scratched area.
- Allow the wax to haze for 5–10 minutes.
- Buff to a shine with a clean, dry cloth.
Option C: Ultra-Fine Steel Wool (#0000) for White or Cloudy Scratches
White or cloudy marks in a clear finish are caused by light scattering through the damaged layer. Ultra-fine #0000 steel wool can gently level the damaged area and restore clarity.
- Rub very lightly with the grain — never across it. Use short strokes.
- Check your progress frequently. The goal is to blend, not remove.
- Follow immediately with a compatible clear wax or Restor-A-Finish to restore the sheen and seal the surface.
Do not use steel wool on oil or wax finishes. It cuts through these softer finishes too aggressively and will cause new surface damage.
5. How to Remove Medium Scratches from Wood (Medium Scratches)
Medium scratches have broken through the finish and lightly scored the wood fiber. Repair requires restoring the wood's color first, then resealing the surface.
Option A: Wood Stain Marker or Touch-Up Pen
Stain markers from brands like Minwax, Varathane, and Old English are purpose-built for this type of repair. They are available in a wide range of wood tones and produce clean, reliable results when matched correctly.
- Test the marker color on the underside of the piece or an inconspicuous area before applying to the visible surface. Color can look different wet versus dry.
- Apply color along the scratch in short, controlled strokes following the wood grain.
- Wipe away any excess immediately with a dry cloth — do not allow it to pool or spread beyond the scratch.
- Once fully dry (15–20 minutes), apply a thin coat of clear furniture wax or a light spray of clear lacquer over the repaired area to seal and protect it.
When in doubt on color, choose one shade lighter. You can always add another pass, but removing stain that is too dark is far more difficult.
Option B: Wood Stain + Clear Topcoat
For a more durable repair on a heavily used piece such as a solid wood dining table:
- Lightly sand only the scratched area with 220-grit sandpaper, working strictly with the grain. Feather the edges so there is no hard boundary between sanded and unsanded finish.
- Wipe away all dust with a tack cloth.
- Apply matching wood stain with a cotton swab or fine brush, working it into the grain.
- Allow to dry completely according to the product instructions — typically 30–60 minutes.
- Apply a thin, compatible clear finish over the repaired area — polyurethane, Danish oil, or paste wax depending on your existing finish type. Allow to cure fully before use.
Option C: Ultra-Fine Steel Wool + Stain
When the finish around the scratch has minor scuffing or dullness:
- Use #0000 steel wool to gently blend the surrounding scuffed finish, working with the grain.
- Apply a matching stain marker or diluted stain to the exposed wood in the scratch itself.
- Once dry, seal the entire area with a compatible clear topcoat.
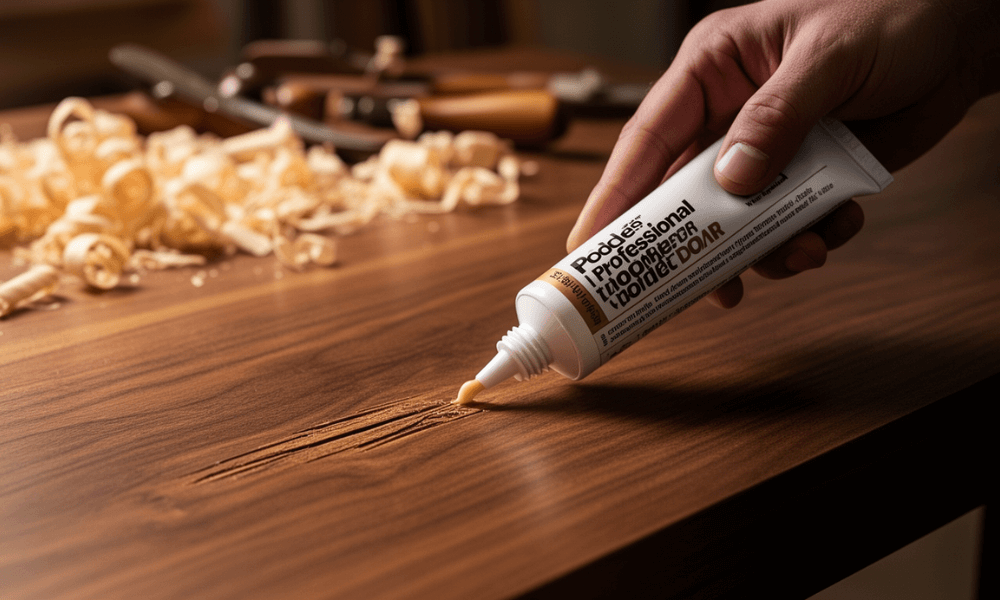
6. How to Repair Deep Scratches and Gouges in Wood (Deep Scratches)
Deep scratches and gouges require filling — physically rebuilding the missing wood material before color and finish can be restored. Patience at each stage is what separates a clean, invisible repair from an obvious one.
Option A: Burn-In Sticks (Wax Filler Sticks)
Burn-in sticks are the professional furniture restorer's preferred method for deep scratch repair. They come in dozens of wood tones, bond well to most finish types, and produce results that are nearly invisible when matched and applied correctly. Mohawk and Blendal are the leading professional-grade brands.
- Select a burn-in stick that closely matches your wood tone. When between two shades, choose the lighter one.
- Heat a burn-in knife or dedicated spatula until warm — not scorching. The material should melt smoothly, not smoke.
- Melt a small amount of filler into the scratch, slightly overfilling the groove.
- Allow the filler to cool and harden completely before proceeding. Do not rush this step.
- Level the repair using a sharp plastic scraper held at 90 degrees to the surface, or sand carefully flush with 400-grit sandpaper.
- Apply a thin coat of clear wax or finish over the repaired area to blend the sheen with the surrounding surface.
The color will appear slightly off until the final finish coat is applied. Judge the match only after sealing.
Option B: Water-Based Wood Filler
Water-based wood fillers such as Timbermate or Famowood are well-suited to gouges, chips, and wider scratches. They sand cleanly, accept stain, and do not shrink excessively.
- Clean the damaged area thoroughly — remove all dust, wax residue, and any loose wood fibers.
- Apply the filler with a putty knife, slightly overfilling the void. The filler will contract slightly as it dries.
- Allow to dry fully. Depending on the depth of the damage, this can take 30 minutes to several hours. Very deep fills may require two applications.
- Sand flush with 220-grit sandpaper working with the grain, then smooth with 320-grit.
- Apply matching wood stain to bring the repaired area in line with the surrounding wood tone.
- Seal the entire repaired section with a compatible clear topcoat — polyurethane, oil finish, or wax — to unify the sheen and protect the repair.
Note: Wood filler absorbs stain differently than natural wood grain. Always test your stain on a sample of the filler before applying to the piece, and expect a slight variation in color. This difference typically diminishes once the topcoat is applied.
Option C: Two-Part Epoxy Wood Filler
For structural damage, large voids, or heirloom pieces where long-term durability is the priority, two-part epoxy fillers such as PC-Woody or Abatron WoodEpox are the most robust option. These products cure hard, resist moisture, and do not shrink over time.
- Mix the two epoxy components according to the manufacturer's specified ratio — typically equal parts by volume. Work efficiently; open time is usually 15–30 minutes before the mixture begins to set.
- Press the mixed epoxy firmly into the damaged area using a putty knife or gloved finger, slightly overfilling.
- Allow to cure fully — approximately 4–6 hours for initial hardness, and 24 hours for full cure. Do not sand before full cure.
- Sand the cured epoxy flush beginning with 80-grit sandpaper, then progress through 120, 180, and 220-grit to achieve a smooth surface.
- Apply a wood-toned grain filler or primer before staining if the epoxy surface is unusually smooth — this helps the stain absorb more consistently.
- Apply matching stain and seal with your chosen finish.
Epoxy repair is the most permanent DIY option available. When done carefully, it is structurally sound and virtually indistinguishable from the surrounding wood.
7. Best Products for Wood Furniture Scratch Repair (Best Products)
These products are reliable, widely available, and trusted by furniture professionals and careful homeowners alike.
| Product | Best For | Approx. Cost |
|---|---|---|
| Howard Restor-A-Finish | Light scratches, finish blending | $10–$15 |
| Old English Scratch Cover | Light to medium scratches; available in light and dark formulas | $6–$10 |
| Minwax Wood Finish Stain Markers | Medium scratches, spot color repair | $6–$12 |
| Mohawk Burn-In Sticks | Medium to deep scratches; professional-grade results | $15–$30 |
| Timbermate Wood Filler | Deep gouges and wide damage areas | $12–$20 |
| PC-Woody Epoxy | Structural damage and heirloom-quality repairs | $20–$35 |
| Howard Feed-N-Wax | Post-repair protection and ongoing finish maintenance | $10–$15 |
For a complete guide to maintaining your furniture after repairs, see our wood furniture care guide.
8. Repair vs. Refinish: How to Decide {#repair-vs-refinish}
Spot repair is the right choice for isolated damage — a single gouge, a cluster of scratches in one area, or a white heat mark. But cumulative wear across a piece eventually calls for something more comprehensive.
Consider full refinishing when:
- Scratches or finish wear covers more than 20–30% of a surface
- The finish has worn through in multiple spots and bare wood is exposed in several places
- The existing finish is peeling, flaking, or bubbling — repair products will not bond properly to a failing finish
- The piece is a high-value or heirloom item and you want a result that is truly restored, not merely improved
Stick with spot repair when:
- Damage is localized — one impact, one area, one set of scratches
- The surrounding finish is in sound condition
- You want to preserve the character and patina the piece has developed over time
One of the genuine advantages of solid wood furniture is that refinishing is always possible. A piece can be stripped back to bare wood and started entirely fresh. That is something veneer or MDF furniture simply cannot offer — once the surface layer is compromised, the damage is permanent.
9. When to Call a Professional
Most scratch repairs are achievable with careful, methodical effort at home. Some situations, however, are better handled by a professional furniture restorer.
Seek professional help when:
- The piece is a genuine antique with monetary or historical significance. Well-intentioned amateur repairs can reduce the value of antiques permanently.
- The damage is structural — broken joints, cracked boards, or deep splitting along the grain — rather than cosmetic.
- The existing finish is shellac, catalyzed lacquer, or conversion varnish. These specialty finishes require professional-grade products and equipment to match and repair correctly.
- A previous repair attempt has made the damage worse. A professional restorer can often correct a failed DIY repair, but the sooner they assess it, the better the outcome.
A qualified furniture restorer can also strip and refinish a piece entirely, re-stain to a different color, replace damaged sections, or repair inlay and marquetry — work that falls well beyond what at-home methods can achieve.
10. Prevention: How to Keep Wood Furniture Scratch-Free (Prevention)
The most effective repair is one that never needs to happen. These habits will protect your solid wood furniture's finish for years.
- Use felt pads under everything. Apply self-adhesive felt pads to the bottom of every object that rests on a wood surface — lamps, vases, decorative pieces, small appliances. Check and replace them as they wear down.
- Lift, don't drag. Dragging objects across wood surfaces is the most common cause of preventable scratches. Develop the habit of lifting, even for small, short movements.
- Coasters and trivets without exception. Use coasters under all glasses and trivets under anything warm or hot. Heat softens and weakens finish, leaving it far more vulnerable to scratching and marking.
- Keep pet nails trimmed. A frequently overlooked source of scratches, particularly on softer wood species such as pine or alder.
- Maintain the finish regularly. Apply a quality furniture wax or conditioner every 6–12 months. A properly nourished finish resists daily wear far better than one that has been left dry and untreated.
- Manage light and humidity. Prolonged direct sunlight and dry heating air degrade wood finish over time, making it brittle and more susceptible to scratching. Use window treatments in sun-exposed rooms and maintain indoor humidity between 35–50% RH year-round.
11. Expert Tips for Professional-Looking Results (Expert Tips)
Always Work With the Grain
Every action — sanding, applying stain, buffing — must follow the direction of the wood's natural lines. Working across or against the grain creates new scratches that are often more visible than the original damage.
Test Color Before Committing
Before applying any stain or touch-up product to a visible surface, test it on the underside of the piece, the back of a leg, or inside a drawer. Color looks different wet versus dry, and different again once a topcoat is applied over it. Never skip this step.
Build Color in Thin Layers
Start with a lighter application than you think you need. Apply one coat, allow it to dry fully, assess the match in natural light, and add another layer only if needed. Applying too much color in one pass is one of the most common repair mistakes — and one of the hardest to correct.
Apply Finish in Thin Coats
One heavy topcoat will pool at the boundary of your repair area and dry with a visible ridge. Multiple thin coats, lightly buffed between each application, will blend seamlessly into the surrounding finish.
Match the Sheen Level
A perfect color match will still produce a visible repair if the sheen level is wrong. A matte patch on a satin finish, or a glossy spot on a flat surface, reads immediately as a repair. Check the sheen of your chosen topcoat product against the surrounding finish before applying — most waxes and finish products are available in matte, satin, and semi-gloss.
Allow Full Drying Time at Every Stage
Rushing between steps is the most common reason repairs look worse than the original scratch. Wet filler sands unevenly. Stain applied over incompletely dry filler blotches. Topcoat applied over tacky stain clouds and loses adhesion. Follow product drying times precisely — and allow an additional 20% more time in humid conditions.
12. FAQs
Q: Can I remove scratches from a wood table without sanding? Yes — for light to medium scratches, products like Howard Restor-A-Finish and wood stain markers work effectively without any sanding. Sanding becomes necessary only when you need to feather a damaged finish area before restaining, or to level a filled gouge flush with the surrounding surface.
Q: How do you remove scratches from a wood table finished with polyurethane? Light scratches in a polyurethane finish can often be resolved using Howard Restor-A-Finish, which chemically blends with the existing clear coat to restore clarity. For deeper scratches, lightly sand the damaged area with 220-grit sandpaper, apply a matching wood stain, allow to dry fully, then reseal with a thin coat of polyurethane. Feather the edges of the sanded area carefully to avoid a hard, visible boundary line.
Q: How do I fix white or cloudy scratches on wood furniture? White or cloudy marks indicate that the clear finish layer is damaged — light is scattering through the compromised area rather than passing through cleanly. The wood itself is typically unaffected. Gently rub the area with #0000 steel wool along the grain to level the damage, then apply Howard Restor-A-Finish or a compatible clear wax to restore clarity and seal the surface.
Q: How do I repair scratches on dark wood furniture? Dark wood tones — walnut, mahogany, ebony-stained pieces — respond well to stain markers and burn-in sticks that are available in deep brown, espresso, and near-black shades. The key principle is to build color gradually: start with a slightly lighter application and layer up to the correct depth. Mohawk burn-in sticks in particular offer a wide range of dark wood tones suited to professional-quality repairs.
Q: Is it worth repairing scratches on solid wood furniture, or should I replace it? Solid wood furniture is almost always worth repairing. Unlike veneer or flat-pack furniture — where surface damage is frequently permanent — solid wood can be spot-repaired, refinished, or stripped entirely back to bare wood and given a completely fresh start. A well-constructed solid wood piece that is properly maintained and repaired when needed will outlast cheaper alternatives by decades.
13. The Bottom Line on Wood Scratch Repair (Conclusion)
Knowing how do you remove scratches from wood means knowing where to start: identify the finish, assess the depth, and choose the method that matches the damage. With the right products and a methodical approach, most repairs — including deep gouges — produce results that are clean, durable, and nearly invisible.
That said, the easiest repair is always the one that never needs to happen. Solid wood furniture, properly finished and consistently maintained, develops genuine resilience over time. And when damage does occur, it can be corrected — sanded, restained, refinished, and restored. That is a quality of longevity and repairability that composite and veneer furniture simply cannot match.
Ready to invest in furniture built to last a lifetime?
Our solid wood pieces are handcrafted from sustainably sourced hardwoods, finished to resist daily wear, and designed to be refinished and handed down through generations. Every purchase includes our complete care and maintenance guide and full support from our team of furniture specialists.
Share:
How to Style a Wooden Coffee Table for Every Living Room Aesthetic
Small Buffet Cabinet vs Console Table: Which Is Better for Small Spaces?